
How To Project Your iPad Screen: 5 Reliable Methods (2025)
Updated 2025
1. AirPlay to a Mac or Apple TV
Best for: wire-free mirroring No extra apps
Steps
- Connect iPad and target device to the same Wi-Fi
- Open Control Center. On newer iPads: swipe down from top right
- Tap Screen Mirroring
- Select your Apple TV or AirPlay-compatible Mac
- Enter the on-screen code if prompted
Pros
- Built in, no installs
- Good classroom reliability
- Carries system audio
Cons
- Requires compatible hardware
- Performance depends on Wi-Fi quality
2. USB-C or HDMI Direct Connection
Best for: lowest latency High resolution
What you need
- USB-C iPad: USB-C to HDMI adapter or a USB-C display
- Lightning iPad: Lightning to HDMI adapter
- HDMI cable to your TV or projector
Unsure which adapter you need? See How to Identify Your iPad Model
Steps
- Connect the adapter to iPad, then HDMI to the display
- Switch the display input to the correct HDMI port
- If the image is clipped, set the display to 16:9 or adjust Zoom/Overscan
Pros
- No Wi-Fi issues
- Lowest lag for video and drawing apps
- Simple once connected
Cons
- Cables and dongles required
- Limited mobility while teaching
3. QuickTime Player on Mac (Wired Mirroring + Recording)
Best for: live demos with narration Easy recording
Steps
- Connect iPad to Mac with a USB-C or Lightning cable
- Open QuickTime Player on the Mac
- File → New Movie Recording
- Click the arrow next to the record button and select your iPad as camera and microphone.
- Press Record if you need a capture of the session
Pros
- Free on every Mac
- Stable image and audio
- Great for tutorials and documentation
Cons
- Wired only
- Requires a Mac
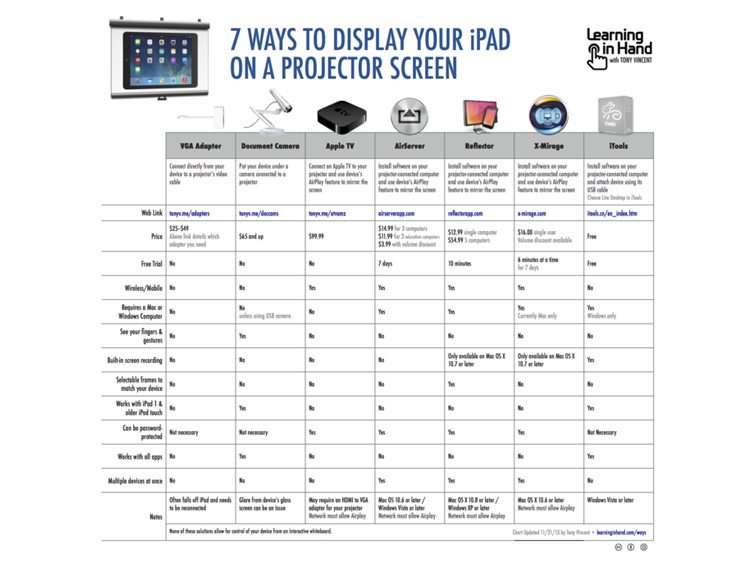
4. Third-Party Screen-Mirroring Receivers (Windows or Multi-Device)
Best for: Windows users Multiple devices on one display
Install a desktop app that acts like an AirPlay receiver on your computer. Common options include Reflector, AirServer, or LonelyScreen. These allow iPad to mirror wirelessly to a Windows PC or a non-AirPlay Mac. Some receivers support recording, layout control, and multiple iPads at once for side-by-side demos.
Basic steps
- Install the receiver on your computer and open it
- Connect iPad and computer to the same network
- On iPad, open Control Center → Screen Mirroring → select your computer
Pros
- Brings AirPlay-style mirroring to Windows
- Recording and annotation in some apps
- Good for multi-iPad sharing
Cons
- Usually paid software.
- Performance depends on Wi-Fi and driver support
5. Video-Conferencing Apps
Best for: remote or hybrid teaching Everyone sees the same screen
Steps
- Join a meeting from your iPad using Zoom, Google Meet, or Microsoft Teams
- Tap Share and choose Screen or iPad Content
- Grant permission when prompted and start the share
- Optional: also join from a room computer to route audio and display to the projector
Pros
- Works over the internet or LAN
- Built-in recording in many platforms
- Students can join from home
Cons
- Quality varies by platform and bandwidth.
- More latency compared to HDMI or QuickTime.
Alternative: Use iPad as a Second Display (Not Just Mirroring)
Older “second screen” app lists often include tools that no longer exist. These are the current patterns that still matter.
- Sidecar for Mac and iPad. Extends your Mac desktop to iPad over USB or Wi-Fi. Supports Apple Pencil in compatible apps.
- Duet Display for Mac and Windows. Extends or mirrors via USB or Wi-Fi. Popular for drawing and note apps.
- Luna Display for Mac and Windows. Hardware dongle that enables very low-latency extended displays.
Quick Troubleshooting
- No device in Screen Mirroring: Confirm both devices are on the same network. Disable VPN on iPad and computer.
- Audio missing over HDMI: On the display, set audio input to HDMI. On iPad, raise volume after connecting.
- Lag or stutter on Wi-Fi: Move closer to the access point. Prefer 5 GHz. Reduce other network loads.
- Image clipped on projector: Turn off overscan on the projector. Try a different HDMI port or cable.
- Receiver not found on Windows: Allow the receiver app through the firewall. Recheck any helper services it installs.