
10 Tips For A Smarter iPad-Based Classroom
by Heather Wolpert-Gawron, author of Writing Behind Every Door: Teaching Common Core Writing in the Subject Areas
When I first raised my hand to pilot my middle school’s first 1:1 classroom, I knew it was going to be bumpy.
After all, I am a practitioner of content, not a tech guru. But the way I see it, I work to not only help guide students to unveil the subject matter (consume), I also work to be up on the most current ways to communicate that content (create). Hence, my willingness to jump out of my wheelhouse, the shallow end of the ed tech pool, and into the deep end of total tech immersion.
The only way to learn was to jump in and jump in early, so I raised my hand.
We’ve Got iPads: Now What?
There are some pluses and minuses in offering to be in the early curve of total tech immersion. My calls for troubleshooting tend to get answered, but I am left to my own learning, and that’s a mixed bag. I get to be more autonomous, and as a new paperless classroom I don’t have to care about our copy allotment, but then again, I don’t get the benefit of having a mentor on campus.
Nevertheless, I’ve learned a lot on this journey. For one thing, when using iPads you need an impeccable network, and believe me, my district’s is not ideal. Growl.
But success isn’t only about the device. You still need solid classroom strategies to make any device meaningful. Therefore, rather than watch you flounder through your own trial and error, I’d like to share some of what I’ve learned. After all, I know what’s it like to open up that pretty Apple packaging and ask, “Now what?”
So here are 10 recommendations to help you utilize your new tool in the most efficient way possible. The goal is to support your content so that the iPad itself doesn’t become your content.

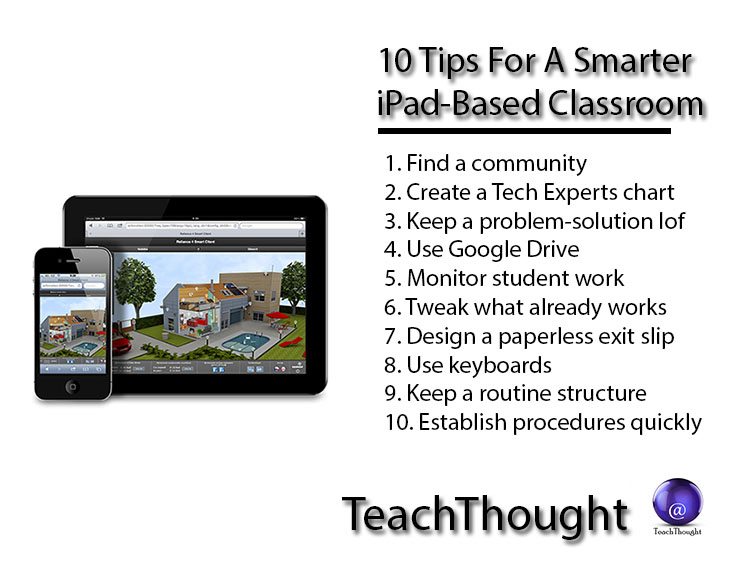
10 Tips For A Smarter iPad-Based Classroom
1. Find a Virtual Learning Community or resources that can consistently provide you with advice
I have found a cool resource, for instance, in Class Tech Tips. Subscribe, and you get daily descriptions of Common Core aligned iPad apps from across the curriculum. (TeachThought also provides a steady diet of educational apps for teaching and learning.)
2. Create a “Tech Experts” chart
These are the tech savvy kids who should be put to work troubleshooting in the classroom while you teach. Post the chart prominently in the room. Let students know that before they come to you for aid, they must go to at least two of the students on the list.
3. Keep a log of what’s going wrong and the strategies used to solve each of the problems
From this log, create a cheat sheet for the students to use. I have even designed a quiz from my handout that asked students to problem solve different tech scenarios. Allow them to use their sheet as a resource to answer the questions.
4. Set up a Google Drive account for you and your students
We are a Google Drive classroom. It allows us to write and collaborate using the cloud, and I have fewer problems with it than with individual iPad apps that claim the same. Remember with Drive, you should go through the Drive app for the smoothest experience possible. Google and Apple sometimes don’t play nicely together.
5. Find a way to monitor the iPads while the students work
Encourage your school to get something like Reflection so you can see thumbnails of everyone’s screens on the projected computer in the front of the room. It’s not about distrust. It’s about human nature. The transparency also allows for quick modeling and feedback. The one drawback for Reflection is that you need that impeccable network.
6. Tweak what already works
Think about your best lessons and how they can be supported and supplemented by using the iPad:
- If you are already using the print version of TimeforKids in your classroom, get access to their digital resources instead.
- If you already ask your students to create a brochure, why not study the persuasiveness in movie trailers and use iMovie to create one themselves?
- If you want students to work in small groups, why not use Google Drive to share documents between groups of students? This also allows you to break down walls between your periods by forming collaborative documents for groups of students across your classes.
- If you already teach informational reading comprehension, why not guide students to the federal government website on copyright laws and assess students using a surveymonkey poll to find out what they understand about policy and consequences?
- If you use passages from classic literature to use as model texts, why not download the classics for free onto their eBooks app?
7. Design a paperless exit card
Have students solve a quick equation as an informal assessment using Paperport Notes. They draw using their finger/stylus, then export right to your own Google Drive or email.
8. Get keyboards
Don’t let the Apple rep fool you–you absolutely need keyboards. The iPads, at this point, while being great at some things, simply aren’t as convenient to type on, cut and paste, and manipulate a document without a keyboard synced. Oh, yeah, and while you’re at it, sync keyboards and iPads one at a time. It will go a lot smoother if the keyboard knows exactly which tablet to sync to. It’s funny when kids inadvertently type on each other’s document from across a table, but the chuckle isn’t worth the trouble.
9. Keep a routine structure
If you always started with an introduction activity, then mini-lesson, then modeled, then released them to do small group work and/or an individual activity, you can still maintain that kind of structure. It’s how and what they consume and how and what they create that changes somewhat. Assuming the tech lives in the classroom, and you can’t count on a true flipped model, you could…
- Start with a homemade screencast on a topic that ends with the students opening a shared document. (5 min.)
- Perhaps that document is a scavenger hunt that guides them to find a resource online. (10 min.)
- Then, they can explore that resource themselves (10 min.)
- Then return to the document for a link to a related activity constructed in Google Form (10 min.).
- Finally, students shoot a quick summary of the lesson and email it to you using the iPad’s camera app (5 min.)
10. Establish procedures quickly
Rehearse often, and assess their progress. They enter. They each retrieve the same iPad as the day before. That way, when someone downloads Bloody Zombies vs. Gross Aliens, you’ll know the culprit. Have them trained to log in to your LMS (like Google Drive or Haiku or Kidblog or whatever.) Have a student per table group retrieve specific equipment for that day (headphones, styluses, etc…)
Have a signal established that let’s them tell you that they are logged in and ready for action. Use the good ole standby, the room job chart, to rotate those with tech responsibilities in the classroom.
Start small with what you ask of your students and yourself. You’ll find that you all tend to move forward together, and by learning together, you’ll form a tighter community of learners. Do what you’re comfortable with and I promise your momentum will increase with every successful lesson that has students using the device in their hands.
Heather Wolpert-Gawron is an award-winning middle school teacher and a popular blogger through Tweenteacher.com and Edutopia.org. Her latest book, Writing Behind Every Door: Teaching Common Core Writing in the Subject Areas (Routledge Eye On Education), will be out on April 3, 2014. She is also the author of ’Tween Crayons and Curfews: Tips for Middle School Teachers (Eye On Education, 2011); Image attribution wikimediacommons and flickeringbrad; 10 Tips For A Smarter iPad-Based Classroom